1st
Go to www.google.com
then put this into the search Bar
inurl:/view/index.shtml
or
intitle:liveapplet inurl:LvAppl
and click on google search
it would show you a list of searched items.
Go to any of the links...Some of them don't work.
Click the links which says Live Applet
You will be able to see street/Traffic cams...
and not only this..you can also control them move them right or left or zoom in or out
Sunday, December 27, 2009
Wednesday, December 16, 2009
How to burn an iso image to a cd
How to burn an iso image to a cd
This tutorial will help you burn an image to a cd.
For this tutorial I will be using Nero because its the best one to use or you can use magic iso or ultra iso but for me Nero is fast. :)
If you would lke another tutorial with a different program post it here and I will be glad to help. Bare in mind that I used an old version of nero that came with my pc, but the old nero should have the same thing just better graphix
First pop in a cd to your disc drive( easiest step :thing:)( Depending on how big your iso image is you might need a dvd rom instead of a cd rom.)
(Example: 678 mb=cd rom; 2 gigs=dvd-rom, anything over 700 mbs will need a dvd-rom)
Second open up Nero: After that make sure that you change the files of type to "all files" or else you wont be able to view your iso image
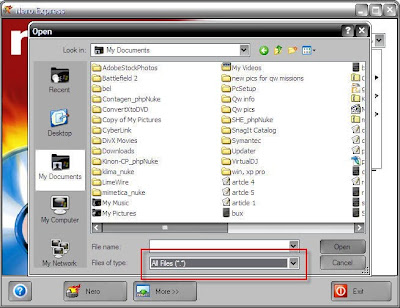 Next go to the location where you have saved you iso file and click on it:
 After you click on your iso image you will get a screen that looks like this:
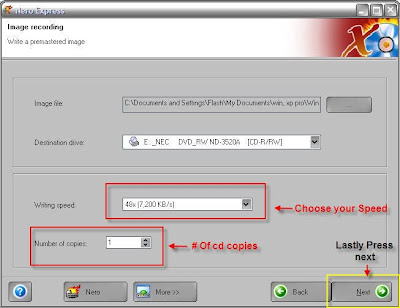 Choose the options that you find reasonable and finally press nextYou will get a screen that looks like this indicating that your image is burning to your cd:
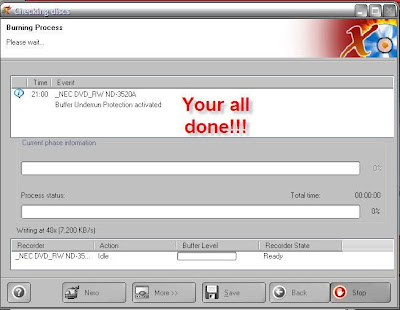 Finally, just wait til the process is done and you will have successfully burned an image to a cd.
This tutorial will help you burn an image to a cd.
For this tutorial I will be using Nero because its the best one to use or you can use magic iso or ultra iso but for me Nero is fast. :)
If you would lke another tutorial with a different program post it here and I will be glad to help. Bare in mind that I used an old version of nero that came with my pc, but the old nero should have the same thing just better graphix
First pop in a cd to your disc drive( easiest step :thing:)( Depending on how big your iso image is you might need a dvd rom instead of a cd rom.)
(Example: 678 mb=cd rom; 2 gigs=dvd-rom, anything over 700 mbs will need a dvd-rom)
Second open up Nero:
 Next go to the copy and back up icon and click on burn image to cd:
 After that, you will get a window that looks like this:
After that make sure that you change the files of type to "all files" or else you wont be able to view your iso imageNext go to the location where you have saved you iso file and click on it:After you click on your iso image you will get a screen that looks like this:Choose the options that you find reasonable and finally press nextYou will get a screen that looks like this indicating that your image is burning to your cd:Finally, just wait til the process is done and you will have successfully burned an image to a cd. clean ur infected flashdrives manually
i found this tut on cleaning ur usb drives manually very helpful and it shows all those hidden batch file running everytime u plug in ur usb flash drives One of the ways by which a virus can infect :void(0)" target=_blank rel=nofollow>your PC is through USB/Pen drives. Common viruses such as ’Ravmon’ , ‘New Folder.exe’, ‘Orkut is banned’ etc are spreading through USB drives. Most :void(0)" target=_blank rel=nofollow>anti virus programs are unable to detect them and even if they do, in most cases they are unable to delete the file, only quarantine it. Here are the things which you can do if you want to remove such viruses from your :void(0)" target=_blank rel=nofollow>USB drivesWhenever you plug a USB drive in your system, a window will appear similar to the one shown below

Don’t click on Ok , just choose ‘Cancel’. Open the :void(0)" target=_blank rel=nofollow>Command Prompt by typing ‘cmd‘ in the run box. In the command prompt type the drive letter: and press enter . Now type dir /w/a and press enter.This will display a list of the files in the pen drive. Check whether the following files are there or not
Autorun.inf
Ravmon.exe
New Folder.exe
svchost.exe
Heap41a
or any other exe file which may be suspicious. If any of the above files are there, then probably the USB drive is infected. In command prompt type attrib -r -a -s -h *.* and press enter. This will remove the Read Only, Archive, System and hidden file attribute from all the files. Now just delete the files using the command del filename. example del Ravmon.exe. Delete all the :void(0)" target=_blank rel=nofollow>files that are suspicious. To be on a safer side, just scan the USB drive with an anti virus program to check whether it is free of virus or not. Now remove the drive and plug it again. In most of the cases, the real culprit turns out to be the “Autorun.inf” file which mostly gets executed when someone clicks Ok in the dialog window which appears above. Thus the infections can spreadSecurity TipDisable the Autoplay feature of USB drives. If you disable the Autoplay feature of USB drives, then there are lesser chances of the virus spreading. A tool which can perform such a function is Tweak UI. Download it from here install it.
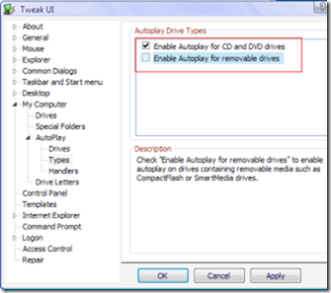
Run the program. Now you can disable the Autoplay feature of the removable drives as shown above. By following the above steps, you can keep your USB drives clean. If there are any other methods which you use, then share it with me through comments.
XP REPAIR INSTALL
XP REPAIR INSTALL 1. Boot the computer using the XP CD. You may need to change the boot order in the system BIOS. Check your system documentation for steps to access the BIOS and change the boot order. 2. When you see the "Welcome To Setup" screen, you will see the options below This portion of the Setup program prepares Microsoft Windows XP to run on your computer:
To setup Windows XP now, press ENTER.
To repair a Windows XP installation using Recovery Console, press R.
To quit Setup without installing Windows XP, press F3. 3. Press Enter to start the Windows Setup.
do not choose "To repair a Windows XP installation using the Recovery Console, press R", (you do not want to load Recovery Console). I repeat, do not choose "To repair a Windows XP installation using the Recovery Console, press R".
4. Accept the License Agreement and Windows will search for existing Windows installations.
5. Select the XP installation you want to repair from the list and press R to start the repair. If Repair is not one of the options, read this Warning!!
6. Setup will copy the necessary files to the hard drive and reboot. Do not press any key to boot from CD when the message appears. Setup will continue as if it were doing a clean install, but your applications and settings will remain intact. Blaster worm warning: Do not immediately activate over the internet when asked, enable the XP firewall [ http://support.microsoft.com/?kbid=283673 ] before connecting to the internet. You can activate after the firewall is enabled. Control Panel - Network Connections. Right click the connection you use, Properties, and there is a check box on the Advanced [ http://michaelstevenstech.com/xpfirewall1.jpg ] page.
7. Reapply updates or service packs applied since initial Windows XP installation. Please note that a Repair Install from the Original install XP CD will remove SP1/SP2 and service packs will need to be reapplied. Service Pack 2 http://www.microsoft.com/downloads/details.aspx?FamilyId=049C9DBE-3B8E- 4F30-8245-9E368D3CDB5A&displaylang=en An option I highly recommend is creating a Slipstreamed XP CD with SP2. Slipstreaming Windows XP with Service Pack 2 (SP2) http://www.winsupersite.com/showcase/windowsxp_sp2_slipstream.asp ______________________________________________________________________ Warning!! If the option to Repair Install is not available and you continue with the install;you will delete your Windows folder and Documents and Settings folder. All applications that place keys in the registry will need to be re-installed. You should exit setup if the repair option is not available and consider other options.
Try the link below if the repair option is not available. Windows XP Crashed? http://www.digitalwebcast.com/2002/03_mar/tutorials/cw_boot_toot.htm Here's Help. A salvage mission into the depths of Windows XP, explained by a non-geek
by Charlie White http://www.digitalwebcast.com/2002/03_mar/tutorials/cw_boot_toot.htm
Related links You May Lose Data or Program Settings After Reinstalling, Repairing, or Upgrading Windows XP (Q312369) http://support.microsoft.com/default.aspx?scid=kb;en-us;Q312369
System Restore "Restore Points" Are Missing or Deleted (Q301224) http://support.microsoft.com/default.aspx?scid=kb;en-us;Q301224
How to Perform an In-Place Upgrade (Reinstallation) of Windows XP (Q315341) http://support.microsoft.com/search/preview.aspx?scid=kb;en-us;Q315341 Warning!! If the Repair Option is not Available What should I do? Most important do not ignore the information below!
If the option to Repair Install is NOT available and you continue with the install; you will delete your Windows folder, Documents and Settings folders. All Applications that place keys in the registry will need to be re-installed.
You should exit setup if the repair option is not available and consider other options. I have found if the Repair option is not available, XP is usually not repairable and will require a Clean install.http://michaelstevenstech.com/cleanxpinstall.html If you still have the ability to access the Windows XP installation, backup all important files not restorable from other sources before attempting any recovery console trouble shooting attempts. Possible Fix by reconfiguring boot.ini using Recovery Console. 1.Boot with XP CD or 6 floppy boot disk set. 2. Press R to load the Recovery Console. 3. Type bootcfg. 4. This should fix any boot.ini errors causing setup not to see the XP OS install. 5. Try the repair install.
One more suggestion from MVP Alex Nichol
"Reboot, this time taking the immediate R option, and if the CD letter is say K: give these commands
COPY K:\i386\ntldr C:\ COPY K:\i386\ntdetect.com C:\
(two other files needed - just in case)
1. Type: ATTRIB -H -R -S C:\boot.ini DEL C:\boot.ini
2. Type: BootCfg /Rebuild
which will get rid of any damaged boot.ini, search the disk for systems and make a new one. This might even result in a damaged windows reappearing; but gives another chance of getting at the repair"
Feedback on success or failure of the above fixes would be greatly appreciated.
Feedback on success or failure of the above fix would be greatly appreciated. xpnews@michaelstevenstech.com
Michael Stevens MS-MVP XPPublishing of this document without permission of the author is forbidden.4-29-2003Revised 11-05-2004
Xp Auto Install
Hello friends
May be this might be useful. I install 98 with backup/restore utility.
My way of auto installation of XP.Then on second partition or the same partition XP without pagefile.sys.
Then i get a dual boot. So after booting into XP, Install all ur fav progiesn games. Test each of them, to make sure they work... etc etc... allur drivers also. Tweak ur xp.
make sure u unhide all files relates to win xp dir and progra files.
Then boot into 98 > goto backup utility of 98.
Select the folders used by XP, egmy documents and settingswinxp (or windows- what ever name u gave to windows dir)check all files in the rootprogram files folderand like this all folders and files used by xp.
then start the backup process.
make sure u have ~ > 3gb of free space on the disk / partitionu r planning to save the image file.
Then when ur XP crashes or U crash it ... lolthen just boot into 98, goto restore option,and click ok. Over write old files or new ones as u like.
It takes ~20min to install
Windows Xp including
Office XpInterdev.net frameworkwinzipwinrartweakseasy cleaneradobegif animatoracdess 6service pack1 , and now service pack 2blan settingsmcafee antiviruszone alarmcute ftp3 proEasy CD-DA Extractor 7EraserAheadLinks OrganizerBulk Rename UtilityBitStrike SoftwareMozilla FirefoxMicrosoft Visual StudioOperaOnlinetimerNokiaUlead SystemsUltraISOVirtual CD v4SlimBrowserYahoo!MsnWebrootSpamihilatorinetpub
U can exclude any folder, u think is not needed at that time for reinstallation.
The whole task id completed in 20 minutes ... in the mean whileI make a nice cup of tea for myself and wait for XP to start
PS: dont forget to include boot.ini file.
Hope it will help.
Winxp Tips And Tricks, Winsock 2 repair
Winxp Tips And Tricks, Winsock 2 repair
WinXP Tips & Trix - Winsock 2 Repair
--------------------------------------------------------------------------------Repairing Damaged Winsock2
The symptoms when Winsock2 is damaged show when you try to release and renew the IP address using IPCONFIG...
And you get the following error message:
An error occurred while renewing interface 'Internet': An operation was attempted on something that is not a socket.
Also Internet Explorer may give the following error message:The page cannot be displayed Additionally, you may have no IP address or no Automatic Private IP Addressing (APIPA) address, and you may be receiving IP packets but not sending them.
There are two easy ways to determine if Winsock2 is damaged:
From the XP source files, go to the Support / Tools directory
Winsock Test Method 1Run netdiag /test:winsock
The end should say Winsock test ..... passed
Winsock Test Method 2
Run Msinfo32Click on the + by ComponentsClick on the by NetworkClick on ProtocolThere should be 10 sections if the Winsock2 key is okMSAFD Tcpip [TCP/IP]MSAFD Tcpip [UDP/IP]RSVP UDP Service ProviderRSVP TCP Service ProviderMSAFD NetBIOS [\Device\NetBT_Tcpip...MSAFD NetBIOS [\Device\NetBT_Tcpip...MSAFD NetBIOS [\Device\NetBT_Tcpip...MSAFD NetBIOS [\Device\NetBT_Tcpip...MSAFD NetBIOS [\Device\NetBT_Tcpip...MSAFD NetBIOS [\Device\NetBT_Tcpip...
If the names are anything different from those in this list, then likely Winsock2 is corrupted and needs to be repaired.If you have any 3rd party software installed, the name MSAFD may be changed.There should be no fewer than 10 sections.
To repair Winsock2
Run RegeditDelete the following two registry keys:HKEY_LOCAL_MACHINE\System\CurrentControlSet\Services\WinsockHKEY_LOCAL_MACHINE\System\CurrentControlSet\Services\Winsock2
Restart the computerGo to Network ConnectionsRight click and select PropertiesClick on the Install buttonSelect ProtocolClick on the Add buttonClick on the Have Disk buttonBrowse to the \Windows\inf directoryClick on the Open buttonClick on the OK buttonHighlight Internet Protocol (TCP/IP)Click on the OK buttonReboot
Windows Xp Tips 'n' Tricks
Windows Xp Tips 'n' Tricks, Windows XP Tips 'n' Tricks
Please note that some of these tips require you to use a Registry Editor (regedit.exe), which could render your system unusable. Thus, none of these tips are supported in any way: Use them at your own risk. Also note that most of these tips will require you to be logged on with Administrative rights.
Unlocking WinXP's setupp.ini============================
WinXP's setupp.ini controls how the CD acts. IE is it an OEM version or retail? First, find your setupp.ini file in the i386 directory on your WinXP CD. Open it up, it'll look something like this:
ExtraData=707A667567736F696F697911AE7E05Pid=55034000
The Pid value is what we're interested in. What's there now looks like a standard default. There are special numbers that determine if it's a retail, oem, or volume license edition. First, we break down that number into two parts. The first five digits determines how the CD will behave, ie is it a retail cd that lets you clean install or upgrade, or an oem cd that only lets you perform a clean install? The last three digits determines what CD key it will accept. You are able to mix and match these values. For example you could make a WinXP cd that acted like a retail cd, yet accepted OEM keys.
Now, for the actual values. Remember the first and last values are interchangable, but usually you'd keep them as a pair:
Retail = 51882 335Volume License = 51883 270OEM = 82503 OEM
So if you wanted a retail CD that took retail keys, the last line of your setupp.ini file would read:
Pid=51882335
And if you wanted a retail CD that took OEM keys, you'd use:
Pid=51882OEM
How do I get the "Administrator" name on Welcome Screen?========================================================
To get Admin account on the "Welcome Screen" as well as the other usernames, make sure that there are no accounts logged in.
Press "ctrl-alt-del" twice and you should be able to login as administrator!
finally worked for me after i found out that all accounts have to be logged out first
Fix Movie Inteferance in AVI files==================================
If you have any AVI files that you saved in Windows 9x, which have interference when opened in Windows XP, there is an easy fix to get rid of the interference:
Open Windows Movie Maker.Click View and then click Options.Click in the box to remove the check mark beside Automatically create clips.
Now, import the movie file that has interference and drag it onto the timeline. Then save the movie, and during the rerendering, the interference will be removed.
Create a Password Reset Disk============================
If you’re running Windows XP Professional as a local user in a workgroup environment, you can create a password reset disk to log onto your computer when you forget your password. To create the disk:
Click Start, click Control Panel, and then click User Accounts.Click your account name.Under Related Tasks, click Prevent a forgotten password.
Follow the directions in the Forgotten Password Wizard to create a password reset disk.
Store the disk in a secure location, because anyone using it can access your local user account
Change Web Page Font Size on the Fly====================================
If your mouse contains a wheel for scrolling, you can change font size on the fly when viewing a Web page. To do so:
Press and hold Ctrl. Scroll down (or towards yourself) to enlarge the font size. Scroll up (or away from yourself) to reduce the font size.
You might find it useful to reduce font size when printing a Web page, so that you can fit more content on the page.
WinXP Clear Page file on shutdown=================================
WINXPCPS.REG (WinXP Clear Page file on shutdown)
This Registration (.REG) file clears the Page file when you power off the computer.Restart Windows for these changes to take effect!ALWAYS BACKUP YOUR SYSTEM BEFORE MAKING ANY CHANGES!
Browse to: HKEY_LOCAL_MACHINE \ System \ CurrentControlSet \ Control \ Session Manager \ Memory Management
and add the DWORD variable "ClearPageFileAtShutdown"=dword:00000001
You can also do this without reg hacking.Go to Control panel Administartative tools, local security policy. then goto local policies ---> security options.Then change the option for "Shutdown: Clear Virtual Memory Pagefile"
Group Policy for Windows XP===========================
One of the most full featured Windows XP configuration tools available is hidden right there in your system, but most people don't even know it exists. It's called the Local Group Policy Editor, or gpedit for short. To invoke this editor, select Start and then Run, then type the following:
gpedit.msc
After you hit ENTER, you'll be greeted by gpedit, which lets you modify virtually every feature in Windows XP without having to resort to regedit. Dig around and enjoy!
Forgetting What Your Files Are?===============================
This procedure works under NTFS.
As times goes along you have a lot files on your computer. You are going to forget what they are. Well here is way to identify them as you scroll through Windows Explorer in the future.
This procedure works under NTFS.
1.. Open up a folder on your system that you want to keep track of the different files you might one to identify in the future.
2.. Under View make certain that you set it to the Details.
3.. Highlight the file you want to keep more information on. Right click the file and you will get a pop up menu. Click on properties.
4.. Click on the Summary Tab (make sure it says simple not advanced on the button in the box), You should now get the following fields,
Title,Subject, Author, Category, Keywords, Comments
You will see advanced also if you have changed it to simple, Here will be other fields you can fill in.
5.. Next you can fill in what ever field you want.
6.. After you finished click the apply button then OK.
7.. Next right click the bar above your files, under the address barand you should get a drop down menu. Here you can click the fields you want to display.
8.. You should now see a list with the new fields and any comments you have done.
9.. Now if you want to sort these just right click a blank spot and then you sort the information to your liking.
Temporarily Assign Yourself Administrative Permissions======================================================
Many programs require you to have Administrative permissions to be able to install them. Here is an easy way to temporarily assign yourself Administrative permissions while you remain logged in as a normal user.
Hold down the Shift key as you right-click on the program’s setup file.
Click Run as.
Type in a username and password that have Administrative permissions.
This will also work on applications in the Start menu.
Create a Shortcut to Lock Your Computer=======================================
Leaving your computer in a hurry but you don’t want to log off? You can double-click a shortcut on your desktop to quickly lock the keyboard and display without using CTRL+ALT+DEL or a screensaver.
To create a shortcut on your desktop to lock your computer:
Right-click the desktop.Point to New, and then click Shortcut.
The Create Shortcut Wizard opens. In the text box, type the following:rundll32.exe user32.dll,LockWorkStation
Click Next.
Enter a name for the shortcut. You can call it "Lock Workstation" or choose any name you like.
Click Finish.
You can also change the shortcut's icon (my personal favorite is the padlock icon in shell32.dll).
To change the icon:
Right click the shortcut and then select Properties.Click the Shortcut tab, and then click the Change Icon button.
In the Look for icons in this file text box, type:Shell32.dll.
Click OK.
Select one of the icons from the list and then click OK
You could also give it a shortcut keystroke such CTRL+ALT+L. This would save you only one keystroke from the normal command, but it could be more convenient.
Create a Shortcut to Start Remote Desktop=========================================
Tip: You can add a shortcut to the desktop of your home computer to quickly start Remote Desktop and connect to your office computer.
To create a shortcut icon to start Remote Desktop
Click Start, point to More Programs, point to Accessories, point to Communications, and then click on Remote Desktop Connection.
Click Options.
Configure settings for the connection to your office computer.
Click Save As, and enter a name, such as Office Computer. Click Save.
Open the Remote Desktops folder.
Right-click on the file named Office Computer, and then click Create Shortcut.
Drag the shortcut onto the desktop of your home computer.
To start Remote Desktop and connect to your office computer, double-click on the shortcut
Instantly Activate a Screensaver================================
Turn on a screensaver without having to wait by adding a shortcut to your desktop:
Click the Start button, and then click Search.In the Search Companion window, click All file types.
In the file name box, type *.scr
In the Look in box, choose Local Hard Drives (C or the drive where you have system files stored on your computer.
Click Search.
You will see a list of screensavers in the results. Pick a screensaver you want. You can preview it by double-clicking it.
Right click on the file, choose Send To, and then click Desktop (create shortcut).
To activate the screensaver, double-click the icon on your desktop
Add a Map Drive Button to the Toolbar=====================================
Do you want to quickly map a drive, but can’t find the toolbar button? If you map drives often, use one of these options to add a Map Drive button to the folder toolbar.
Option One (Long Term Fix)
Click Start, click My Computer, right-click the toolbar, then unlock the toolbars, if necessary.
Right-click the toolbar again, and then click Customize.
Under Available toolbar buttons, locate Map Drive, and drag it into the position you want on the right under Current toolbar buttons.
Click Close, click OK, and then click OK again.
You now have drive mapping buttons on your toolbar, so you can map drives from any folder window. To unmap drives, follow the above procedure, selecting Disconnect under Available toolbar buttons. To quickly map a drive, try this option.
Option Two (Quick Fix)
Click Start, and right-click My Computer.Click Map Network Drive.
If you place your My Computer icon directly on the desktop, you can make this move in only two clicks!
Software not installing?========================
If you have a piece of software that refuses to install because it says that you are not running Windows 2000 (such as the Win2K drivers for a Mustek scanner!!) you can simply edit HKEY_LOCAL_MACHINE/SOFTWARE/Microsoft/Windows NT/CurrentVersion/ProductName to say Microsoft Windows 2000 instead of XP and it will install. You may also have to edit the version number or build number, depending on how hard the program tries to verify that you are installing on the correct OS. I had to do this for my Mustek 600 CP scanner (compatibility mode didn''t help!!!) and it worked great, so I now have my scanner working with XP (and a tech at Mustek can now eat his words).
BTW, don''t forget to restore any changes you make after you get your software installed
You do this at your own risk.
Use your Windows Key====================
The Windows logo key, located in the bottom row of most computer keyboards is a little-used treasure. Don''t ignore it. It is the shortcut anchor for the following commands:
Windows: Display the Start menuWindows + D: Minimize or restore all windowsWindows + E: Display Windows ExplorerWindows + F: Display Search for filesWindows + Ctrl + F: Display Search for computerWindows + F1: Display Help and Support CenterWindows + R: Display Run dialog boxWindows + break: Display System Properties dialog boxWindows + shift + M: Undo minimize all windowsWindows + L: Lock the workstationWindows + U: Open Utility ManagerWindows + Q: Quick switching of users (Powertoys only)Windows + Q: Hold Windows Key, then tap Q to scroll thru the different users on your pc
Change your cd key==================
You don't need to re-install if you want to try the key out ... just do this:
1. Go to Activate Windows2. Select the Telephone option3. Click "Change Product Key"4. Enter NOT ALLOWED ~ Zabref5. Click "Update"
Now log off and log back in again. It should now show 60 days left, minus the number of days it had already counted down.
Note: If your crack de-activated REGWIZC.DLL and LICDLL.DLL, you are going to have to re-register them.
Remove the Shared Documents folders from My Computer====================================================
One of the most annoying things about the new Windows XP user interface is that Microsoft saw fit to provide links to all of the Shared Documents folders on your system, right at the top of the My Computer window. I can't imagine why this would be the default, even in a shared PC environment at home, but what's even more annoying is that you cannot change this behavior through the sh*ll: Those icons are stuck there and you have to live with it.Until now, that is.
Simply fire up the Registry Editor and navigate to the following key:HKEY_LOCAL_MACHINE \ SOFTWARE \ Microsoft \ Windows \ CurrentVersion \ Explorer \ My Computer \ NameSpace \ DelegateFolders
You'll see a sub-key named {59031a47-3f72-44a7-89c5-5595fe6b30ee}. If you delete this, all of the Shared Documents folders (which are normally under the group called "Other Files Stored on This Computer" will be gone.
You do not need to reboot your system to see the change.
Before: A cluttered mess with icons no one will ever use (especially that orpaned one). After: Simplicity itself, and the way it should be by default.
This tip For older XP builds===================
Edit or remove the "Comments" link in window title bars
During the Windows XP beta, Microsoft has added a "Comments?" hyperlink to the title bar of each window in the system so that beta testers can more easily send in a problem report about the user interface. But for most of us, this isn't an issue, and the Comments link is simply a visual distraction. And for many programs that alter the title bar, the Comments link renders the Minimize, Maximize, and Close window buttons unusable, so it's actually a problem.Let's get rid of it. Or, if you're into this kind of thing, you can edit it too.
Open the Registry Editor and navigate to the following keys:My Computer \ HKEY_CURRENT_USER \ Control Panel \ Desktop \ LameButtonEnabledMy Computer \ HKEY_CURRENT_USER \ Control Panel \ Desktop \ LameButtonText
The first key determines whether the link appears at all; change its value to 0 to turn it off. The second key lets you have a little fun with the hyperlink; you can change the text to anything you'd like, such as "Paul Thurrott" or whatever.
Editing either value requires a restart before the changes take effect.
Before: An unnecessary hyperlink. Have some fun with it! Or just remove it entirely. It's up to you.
Rip high-quality MP3s in Windows Media Player 8================================================
The relationship between Windows Media Player 8 and the MP3 audio format is widely misunderstood. Basically, WMP8 will be able to playback MP3 files, but encoding (or "ripping" CD audio into MP3 format will require an MP3 plug-in. So during the Windows XP beta, Microsoft is supplying a sample MP3 plug-in for testing purposes, but it's limited to 56 Kbps rips, which is pretty useless. However, if you have an externally installed MP3 codec, you can use WMP8 to rip at higher bit rates. But you'll have to edit the Registry to make this work.Fire up the Registry Editor and navigate to the following key:HKEY_LOCAL_MACHINE \ SOFTWARE \ Microsoft \ MediaPlayer \ Settings \ MP3Encoding
Here, you'll see sub-keys for LowRate and LowRateSample, which of course equates to the single 56 Kbps sample rate you see in WMP8. To get better sampling rates, try adding the following keys (Using New then DWORD value):
"LowRate" = DWORD value of 0000dac0"MediumRate" = DWORD value of 0000fa00"MediumHighRate" = DWORD value of 0001f400"HighRate" = DWORD value of 0002ee00
Now, when you launch WMP8 and go into Tools, then Options, then Copy Music, you will have four encoding choices for MP3: 56 Kbps, 64 Kbps, 128 Kbps, and 192 Kbps. Note that you will not get higher bit rate encoding unless you have installed an MP3 codec separately; the version in Windows Media Player 8 is limited to 56 Kbps only.
Find the appropriate location in the Registry... ...add a few DWORD values... ...And then you'll be ripping CDs in higher-quality MP3 format!
Speed up the Start Menu=======================
The default speed of the Start Menu is pretty slow, but you can fix that by editing a Registry Key. Fire up the Registry Editor and navigate to the following key:HKEY_CURRENT_USER \ Control Panel \ Desktop \ MenuShowDelay
By default, the value is 400. Change this to a smaller value, such as 0, to speed it up.
Speed up the Start Menu (Part two)==================================
If your confounded by the slow speed of the Start Menu, even after using the tip above, then you might try the following: Navigate to Display Properties then Appearance then Advanced and turn off the option titled Show menu shadow . You will get much better overall performance.
Speed up Internet Explorer 6 Favorites======================================
For some reason, the Favorites menu in IE 6 seems to slow down dramatically sometimes--I've noticed this happens when you install Tweak UI 1.33, for example, and when you use the preview tip to speed up the Start menu. But here's a fix for the problem that does work, though it's unclear why:Just open a command line window (Start button -> Run -> cmd) and type sfc, then hit ENTER. This command line runs the System File Checker, which performs a number of services, all of which are completely unrelated to IE 6. But there you go: It works.
Do an unattended installation=============================
The Windows XP Setup routine is much nicer than that in Windows 2000 or Windows Me, but it's still an hour-long process that forces you to sit in front of your computer for an hour, answering dialog boxes and typing in product keys. But Windows XP picks up one of the more useful features from Windows 2000, the ability to do an unattended installation, so you can simply prepare a script that will answer all those dialogs for you and let you spend some quality time with your family.I've written about Windows 2000 unattended installations and the process is pretty much identical on Windows XP, so please read that article carefully before proceeding. And you need to be aware that this feature is designed for a standalone Windows XP system: If you want to dual-boot Windows XP with another OS, you're going to have to go through the interactive Setup just like everyone else: An unattended install will wipe out your hard drive and install only Windows XP, usually.
To perform an unattended installation, you just need to work with the Setup Manager, which is located on the Windows XP CD-ROM in D:\SupportTools\DEPLOY.CAB by default: Extract the contents of this file and you'll find a number of useful tools and help files; the one we're interested in is named setupmgr.exe. This is a very simple wizard application that will walk you through the process of creating an answer file called winnt.sif that can be used to guide Windows XP Setup through the unattended installation.
One final tip: There's one thing that Setup Manager doesn't add: Your product key. However, you can add this to the unattend.txt file manually. Simply open the file in Notepad and add the following line under the [UserData] section:
ProductID=RK7J8-2PGYQ-P47VV-V6PMB-F6XPQ
(This is a 60 day cd key)
Then, just copy winnt.sif to a floppy, put your Windows XP CD-ROM in the CD drive, and reboot: When the CD auto-boots, it will look for the unattend.txt file in A: automatically, and use it to answer the Setup questions if it's there.
Finally, please remember that this will wipe out your system! Back up first, and spend some time with the help files in DEPLOY.CAB before proceeding.
For Older builds or not using setupreg.hiv file===============================================
Remove the Desktop version text
During the Windows XP beta, you will see text in the lower right corner of the screen that says Windows XP Professional, Evaluation Copy. Build 2462 or similar. A lot of people would like to remove this text for some reason, and while it's possible to do so, the cure is more damaging than the problem, in my opinion. So the following step will remove this text, but you'll lose a lot of the nice graphical effects that come in Windows XP, such as the see-through icon text.
To remove the desktop version text, open Display Properties (right-click the desktop, then choose Properties) and navigate to the Desktop page. Click Customize Desktop and then choose the Web page in the resulting dialog. On this page, check the option titled Lock desktop items. Click OK to close the dialog, and then OK to close Display Properties. The text disappears. But now the rest of your system is really ugly. You can reverse the process by unchecking Lock desktop items.
There's also a shortcut for this process: Just right-click the desktop and choose Arrange by then Lock Web Icons on the Desktop.
--------------------------------------------------------------------------------Enable ClearType on the Welcome Screen!=======================================
As laptop users and other LCD owners are quickly realizing, Microsoft's ClearType technology in Windows XP really makes a big difference for readability. But the this feature is enabled on a per-user basis in Windows XP, so you can't see the effect on the Welcome screen; it only appears after you logon.
But you can fix that. Fire up the Registry Editor and look for the following keys:
(default user) HKEY_USERS \ .Default \ Control Panel \ Desktop \ FontSmoothing (String Value)HKEY_USERS \ .Default \ Control Panel \ Desktop \ FontSmoothingType (Hexadecimal DWORD Value)
Make sure both of these values are set to 2 and you'll have ClearType enabled on the Welcome screen and on each new user by default.
Stop Windows Messenger from Auto-Starting=========================================
If you're not a big fan of Windows Messenger simply delete the following Registry Key:
HKEY_CURRENT_USER\Software\Microsoft\Windows\CurrentVersion\Run\MSMSGS
Display Hibernate Option on the Shut Down dialog================================================
For some reason, Hibernate may not be available from the default Shut Down dialog. But you can enable it simply enough, by holding down the SHIFT key while the dialog is visible. Now you see it, now you don't!
Add album art to any music folder=================================
One of the coolest new features in Windows XP is its album thumbnail generator, which automatically places the appropriate album cover art on the folder to which you are copying music (generally in WMA format). But what about those people that have already copied their CDs to the hard drive using MP3 format? You can download album cover art from sites such as cdnow.com or amguide.com, and then use the new Windows XP folder customize feature to display the proper image for each folder. But this takes time--you have to manually edit the folder properties for every single folder--and you will lose customizations if you have to reinstall the OS. There's an excellent fix, however.
When you download the album cover art from the Web, just save the images as folder.jpg each time and place them in the appropriate folder. Then, Windows XP will automatically use that image as the thumbnail for that folder and, best of all, will use that image in Windows Media Player for Windows XP (MPXP) if you choose to display album cover art instead of a visualization. And the folder customization is automatic, so it survives an OS reinstallation as well. Your music folders never looked so good!
Album cover art makes music folder thumbnails look better than ever!
Change the location of the My Music or My Pictures folders==========================================================
In Windows 2000, Microsoft added the ability to right-click the My Documents folder and choose a new location for that folder in the sh*ll. With Windows XP, Microsoft has elevated the My Music and My Pictures folders to the same "special sh*llfolder" status of My Documents, but they never added a similar (and simple) method for changing those folder's locations. However, it is actually pretty easy to change the location of these folders, using the following method.
Open a My Computer window and navigate to the location where you'd like My Music (or My Pictures) to reside. Then, open the My Documents folder in a different window. Drag the My Music (or My Pictures) folder to the other window, and Windows XP will update all of the references to that folder to the new location, including the Start menu.
Or use Tweak UI
Add/Remove optional features of Windows XP==========================================
To dramatically expand the list of applications you can remove from Windows XP after installation, navigate to C:\WINDOWS\inf (substituting the correct drive letter for your version of Windows) and open the sysoc.inf file. Under Windows XP Professional Edition RC1, this file will resemble the following by default:
[Version] Signature = "$Windows NT$"DriverVer=06/26/2001,5.1.2505.0
[Components]NtComponents=ntoc.dll,NtOcSetupProc,,4WBEM=ocgen.dll,OcEntry,wbemoc.inf,hide,7Display=desk.cpl,DisplayOcSetupProc,,7Fax=fxsocm.dll,FaxOcmSetupProc,fxsocm.inf,,7NetOC=netoc.dll,NetOcSetupProc,netoc.inf,,7iis=iis.dll,OcEntry,iis.inf,,7com=comsetup.dll,OcEntry,comnt5.inf,hide,7dtc=msdtcstp.dll,OcEntry,dtcnt5.inf,hide,7IndexSrv_System = setupqry.dll,IndexSrv,setupqry.inf,,7TerminalServer=TsOc.dll, HydraOc, TsOc.inf,hide,2msmq=msmqocm.dll,MsmqOcm,msmqocm.inf,,6ims=imsinsnt.dll,OcEntry,ims.inf,,7fp_extensions=fp40ext.dll,FrontPage4Extensions,fp40ext.inf,,7AutoUpdate=ocgen.dll,OcEntry,au.inf,hide,7msmsgs=msgrocm.dll,OcEntry,msmsgs.inf,hide,7msnexplr=ocmsn.dll,OcEntry,msnmsn.inf,,7smarttgs=ocgen.dll,OcEntry,msnsl.inf,,7RootAutoUpdate=ocgen.dll,OcEntry,rootau.inf,,7Games=ocgen.dll,OcEntry,games.inf,,7AccessUtil=ocgen.dll,OcEntry,accessor.inf,,7CommApps=ocgen.dll,OcEntry,communic.inf,HIDE,7MultiM=ocgen.dll,OcEntry,multimed.inf,HIDE,7AccessOpt=ocgen.dll,OcEntry,optional.inf,HIDE,7Pinball=ocgen.dll,OcEntry,pinball.inf,HIDE,7MSWordPad=ocgen.dll,OcEntry,wordpad.inf,HIDE,7ZoneGames=zoneoc.dll,ZoneSetupProc,igames.inf,,7
[Global]WindowTitle=%WindowTitle%WindowTitle.StandAlone="*"
The entries that include the text hide or HIDE will not show up in Add/Remove Windows Components by default. To fix this, do a global search and replace for ,hide and change each instance of this to , (a comma). Then, save the file, relaunch Add/Remove Windows Components, and tweak the installed applications to your heart's content.
Cool, eh? There are even more new options now under "Accessories and Utilities" too.
Remove Windows Messenger========================
It seems that a lot of people are interested in removing Windows Messenger for some reason, though I strongly recommend against this: In Windows XP, Windows Messenger will be the hub of your connection to the .NET world, and now that this feature is part of Windows, I think we're going to see a lot of .NET Passport-enabled Web sites appearing as well. But if you can't stand the little app, there are a couple of ways to get rid of it, and ensure that it doesn't pop up every time you boot into XP. The best way simply utilizes the previous tip:
If you'd like Windows Messenger to show up in the list of programs you can add and remove from Windows, navigate to C:\WINDOWS\inf (substituting the correct drive letter for your version of Windows) and open sysoc.inf (see the previous tip for more information about this file). You'll see a line that reads:
msmsgs=msgrocm.dll,OcEntry,msmsgs.inf,hide,7
Change this to the following and Windows Messenger will appear in Add or Remove Programs, then Add/Remove Windows Components, then , and you can remove it for good:
msmsgs=msgrocm.dll,OcEntry,msmsgs.inf,7
Remove Msn Messenger From Xp, several ways..
Remove MSN Messenger from XP
First of all you can try what Microsoft Suggests:CODEhttp://support.microsoft.com/?kbid=302089===================================================================then you may try some more ways of removing MSN.I am not responsible for the use or the misuse of this information.Use at your own risk.
==================================================================2nd way:To remove MSN Messenger open your run box and copy/paste this:RunDll32 advpack.dll,LaunchINFSection %windir%\INF\msmsgs.inf,BLC.RemoveClick OK, follow any instructions that may pop up, and and MSN Messenger willuninstall! you should be rid of the little pain forever !(Always easy to reload it if you decide you want it in the future.)
==================================================================
3rd way:The following method works in Windows XP Professional, buthas not been tested on a system with SP1 installed. FYI, I've seen scripts that aresimilar to this, but fail miserably, automatically deleting other much-neededcomponents! Better to do this slow and manually!
1. Exit MSN Messenger by right-clicking the MSN icon in the notification area, andselecting Exit.2. Add the following registry entries, both with a DWORD value of 1:
a. HKEY_LOCAL_MACHINE\Software\Policies\Microsoft\Messenger\Client\PreventRunb. HKEY_LOCAL_MACHINE\Software\Policies\Microsoft\Messenger\Client\PreventAutoRun
3. Open a command prompt by clicking Start/Run, then typing "command" and clicking OK.4. Uninstall MSN Messenger by typing "rundll32 advpack.dll,LaunchINFSection %systemRoot%\INF\msmsgs.inf,BLC.Remove"5. Uninstall the leftover installation information file by typing"rundll32 setupapi,InstallHinfSection BLC.Remove 128 %systemRoot%\INF\msmsgs.inf"6. Allow MSN Messenger to be displayed in the Add/Remove Windows Components dialogin the future (if it pops up again!)by typing "notepad.exe %systemRoot%\INF\sysoc.inf" and deleting the word "hide" from theline that starts with "msmsgs=".It MAY be possible to skip to this step directly and perform the uninstallation directly fromthe Add/Remove Windows Components dialog, but that method MAY leave unwantedcomponents and has not been thoroughly tested.7. Cross your fingers and reboot! You will probably get a message asking you to confirm theremoval of some leftover files. Click OK.
=====================================================================
4th way:There Is a way to uninstall Messenger cleanly. I don't know if these steps apply for Home version.1. Control PanelAdd Remove Programs click on "add emove windows components" on the left hand side.In the box that pops up...scroll down to the bottom and highlight "windows messenger" then UNcheck the box.2. Hit next and let the uninstall complete. (it's not a very obvious un-install) When it's, done make sure youto RESTART WINDOWS! (the messenger icon will still be in the tray if you don't!)
======================================================================5th way:Search for sysoc.inf. It should be located in the C:\windows\inf\........CODEvisit the:http://www.tacktech.com/display.cfm?ttid=288and follow the excellent instructions given step by step by icons!
======================================================================6th way1. First, right click the Messenger icon in the system tray and click Exit.2. Right click the Start button and click the Explore command to open the Windows Explorer.3. In the Windows Explorer, expand the Program Files folder on the partition where your operatingsystem is installed (the partition that holds the WINDOWS directory) and right click the Messengerfolder and select Rename.4. Rename the folder to MessengerDISABLED and press ENTER to commit the name change.5. Restart the Computer. No more Windows Messenger
====================================================================7th way and many thanks to ralph for the following:
You could also check out...CODEhttp://grc.com/stm/shootthemessenger.htm
Download and run our small (22 kbyte) "ShootTheMessenger.exe" utility. It will display the currentstatus of your system's Messenger Service. The button near the bottom of its window will allowyou to set the service to whichever state ? running or disabled ? that you desire.
If, for any reason, you should ever choose to re-enable the Windows Messenger Service, simplyre-run ShootTheMessenger to do so.====================================================================
You could also check out...
CODEhttp://grc.com/stm/shootthemessenger.htm
QUOTEDownload and run our small (22 kbyte) "ShootTheMessenger.exe" utility. It will display the current status of your system's Messenger Service. The button near the bottom of its window will allow you to set the service to whichever state ? running or disabled ? that you desire.
If, for any reason, you should ever choose to re-enable the Windows Messenger Service, simply re-run ShootTheMessenger to do so.
Remote Shutdown
XP PRO has a lot of fun utilities. One of the most useful ones I have found to date is the ability to remotely reboot a PC. There are 2 ways of doing this. You will need to have admin access to the PC to preform these actions. That being said, here is the first way to do it:
Right click my computer, choose manage.Highlight the Computer Management (Local) then click on Action, choose connect to another computer.In the window that opens fill in the machine name of the PC you want to connect to and click ok.Once connected right click on Computer Management (Remote machine name) and choose properties.Go to the "Advanced" tab and click the Settings button under Start up and recovery.Click on the Shutdown button.Under action choose what you want to do (you can log off current user, shut down, restart, or power down. you can also choose if you want to force all applications to close, close hung apps, or wait for all apps to close by themselves).
The second way... Remember dos... that good old thing. Open up a command prompt and enter in the following:
%windir%\System32\shutdown.exe -r -m \\Machinename. The command prompt has more switches and options. I highly suggest using shutdown.exe /? to see all the posibilities.
Remote Desktop Through Company Firewall
Remote Desktop Through Company Firewall
Dont wanna take any credit for this as i got this from another forum thought of it as quite informative so pastin it here
Note this tutorial is collection of tips I gathered from searching the internet and some credit is due to the original authors. None of which I know.
A lot of people I know love using the Windows Remote Desktop feature at work, however are prevented from connecting to their home computer because of the company firewall. This is because most corporate firewalls block port 3389 which Remote Desktop uses. Most just switch to VNC, however most find it slower than Remote Desktop.
This quick tutorial shows how (from a fire walled network that blocks port 3389) you can access your home computer using MS Remote Desktop.
*This tutorial assumes you have or know how to setup and dynamic DNS client if you need one
*Assumes you know how to setup port forwarding if you need to.
Because Remote Desktop is using port 3389 by default, it is not possible to go through a firewall. So you can use port 443. Because this port is always open on your companies firewall to allow https. (One would assume )
At your home PC:
1) Configure Your pc to allow Remote Connections in your System Properties (windows - Break) tab Remote. Check 'Allow users to connect remote to this computer.
2) (add users if needed)
3) According toCODEhttp://support.microsoft.com/default.aspx?scid=kb;en-us;306759]
In the registry changeHKEY_LOCAL_MACHINE\System\CurrentControlSet\Control\TerminalServer\WinStations\RDP-Tcp\PortNumber to 443 (click Decimal radio button first)
*Configure your firewall to allow traffic through port 443 (If you need to)
*Configure your route to forward port 443 to your computer (If you need to)
If you have IIS running you have to change the port number of https. because it is already listening on this port.C:\WINDOWS\system32\cscript.exe c:\inetpub\adminscripts\adsutil.vbs SET w3svc/1/SecureBindings ":444:"
Or just disable IIS Service
For your PC at work:
According toCODEhttp://support.microsoft.com/default.aspx?scid=kb;en-us;304304
you can just type the port after the IP-Address of your home PC.
*Or if you have a Dynamic DNS Client such as No-IP or DynDNS you can type in that address.
AlternativelyYou can add the following to the rdp file. (which you can get to click on Save As on the tab General of Remote Desktop Connection)server port:i:443
Extra tip: to have access to your clients hard disk on your remote desktop, check Disk Drives on the tab Local Resources of Remote Desktop Connection
Release Codes, Read, and Learn
0-Day - Release of the same day;0-Sec - Instant release;AC3 - Audio Coding 3, audio codec, usually 5.1 audio channels;AFFiLS - Websites affiliated to the groups, where they put the releases;ANiME - Release of a anime movie;ASF - Advanced Streaming Format, audio/video compression codec based in MPEG-4;CE - Classical Edition, of a original movie;CLSC - Classical release;COLOUR EDiTiON - Release of a movie with edit in color level;COURiER - Dumper/racer of a groups, has the job of distribute the releases through websites;CUT/CUTED - Partial release of a movie;DC - Director's Cute, release of a movie with selections of the director's;DSYNCH - Not synchronized;DiRFiX - Fix of a release name;DiVX - Division X, compression video codec;DOWNSAMPLED - Manipulation of the video/audio format because of low bitrates;DUBBED - Movie with double language (original one or other);DUMP - Release transfer;DUMPER - Who makes the dumps;DUPE - Doubled release;DVDR - Release format fot a complete DVD or Downsampled;DVDRiP - Rip which source is the original DVD;DVDSCR/DVDSCREENER - Rip which source is a pre-release DVD.FiX - Correction for something;FS - Full screen, resolution 4:3;FTP - File Transfer Protocol, way of transfer files;FXP - File eXchange Protocol, way of share data through FTP;GRP.RQT - Group Request, request of a new release because some other is nuked;iNT, iNTERNAL - Internal release group, doesn't count for release races;LDRiP - Rip which source is a laser disc;LiMiTED - Release of a limited movie (in some theaters);NTSC - National Television System Committe, video stream system of South America and east Asia;NUKED - Bad release, release with problems;PAL - Phase Altering Line, stream video system of Europe;PROPER - Good release, substitutes a nuked release;PROMO - Promotional;REPACK - Repacked released;RETAiL - Rip which source is a commercial DVD;SRT - Sequense Real Time, text subtitles format;SUB - Text subtitles format;SYNCFiX - Synchronization fix;TS - Theather screener, movie recorded in theathers;VCD - Video Compact Disc, distibution of MPEG content;VCDRiP - Rip which source is a VCD;VHSRiP - Rip which source is a VHSWS - Wide Screen, resolution 16:9XViD - Video compression codec based in MPEG-4XXX - Porn release;
Reinstall Internet Explorer 6
Microsoft Windows XP won't allow you to uninstall Internet Explorer. How can you fix the browser or even reinstall the program if it becomes corrupt?
If you don't yet have the very latest Internet Explorer, you can fix many problems by visiting
http://windowsupdate.microsoft.com
and updating to the latest version. If you're already up to date, however, the site won't let you reinstall the program. You need to fool the system into thinking you don't have the latest version.
Launch REGEDIT from the Start menu's Run dialog and navigate to the key HKEY_LOCAL_MACHINE\SOFTWARE\ Microsoft\Active Setup\Installed Components\{89820200-ECBD-11cf-8B85-00AA005B4383}. In the right-hand pane, double-click on the DWORD value IsInstalled and change it from 1 to 0 (no matter whether you choose Decimal or Hexadecimal). Close REGEDIT and go to the Windows update site again. Now it should let you "update" IE and, with luck, fix the problems.
By the way, you can do the same thing if you need to repair Outlook Express, but at the key HKEY_LOCAL_MACHINE\SOFTWARE\Microsoft\Active Setup\Installed Components\{44BBA840-CC51-11CF-AAFA-00AA00B6015C}.
Keyboard Shortcuts, must read
Getting used to using your keyboard exclusively and leaving your mouse behind will make you much more efficient at performing any task on any Windows system. I use the following keyboard shortcuts every day:
Windows key + R = Run menu
This is usually followed by:cmd = Command Promptiexplore + "web address" = Internet Explorercompmgmt.msc = Computer Managementdhcpmgmt.msc = DHCP Managementdnsmgmt.msc = DNS Managementservices.msc = Serviceseventvwr = Event Viewerdsa.msc = Active Directory Users and Computersdssite.msc = Active Directory Sites and ServicesWindows key + E = Explorer
ALT + Tab = Switch between windows
ALT, Space, X = Maximize window
CTRL + Shift + Esc = Task Manager
Windows key + Break = System properties
Windows key + F = Search
Windows key + D = Hide/Display all windows
CTRL + C = copy
CTRL + X = cut
CTRL + V = paste
Also don't forget about the "Right-click" key next to the right Windows key on your keyboard. Using the arrows and that key can get just about anything done once you've opened up any program.
Keyboard Shortcuts
[Alt] and [Esc] Switch between running applications
[Alt] and letter Select menu item by underlined letter
[Ctrl] and [Esc] Open Program Menu
[Ctrl] and [F4] Close active document or group windows (does not work with some applications)
[Alt] and [F4] Quit active application or close current window
[Alt] and [-] Open Control menu for active document
Ctrl] Lft., Rt. arrow Move cursor forward or back one word
Ctrl] Up, Down arrow Move cursor forward or back one paragraph
[F1] Open Help for active application
Windows+M Minimize all open windows
Shift+Windows+M Undo minimize all open windows
Windows+F1 Open Windows Help
Windows+Tab Cycle through the Taskbar buttons
Windows+Break Open the System Properties dialog box
acessability shortcuts
Right SHIFT for eight seconds........ Switch FilterKeys on and off.
Left ALT +left SHIFT +PRINT SCREEN....... Switch High Contrast on and off.
Left ALT +left SHIFT +NUM LOCK....... Switch MouseKeys on and off.
SHIFT....... five times Switch StickyKeys on and off.
NUM LOCK...... for five seconds Switch ToggleKeys on and off.
explorer shortcuts
END....... Display the bottom of the active window.
HOME....... Display the top of the active window.
NUM LOCK+ASTERISK....... on numeric keypad (*) Display all subfolders under the selected folder.
NUM LOCK+PLUS SIGN....... on numeric keypad (+) Display the contents of the selected folder.
NUM LOCK+MINUS SIGN....... on numeric keypad (-) Collapse the selected folder.
LEFT ARROW...... Collapse current selection if it's expanded, or select parent folder.
RIGHT ARROW....... Display current selection if it's collapsed, or select first subfolder.
Type the following commands in your Run Box (Windows Key + R) or Start Run
devmgmt.msc = Device Managermsinfo32 = System Informationcleanmgr = Disk Cleanupntbackup = Backup or Restore Wizard (Windows Backup Utility)mmc = Microsoft Management Consoleexcel = Microsoft Excel (If Installed)msaccess = Microsoft Access (If Installed)powerpnt = Microsoft PowerPoint (If Installed)winword = Microsoft Word (If Installed)frontpg = Microsoft FrontPage (If Installed)notepad = Notepadwordpad = WordPadcalc = Calculatormsmsgs = Windows Messengermspaint = Microsoft Paintwmplayer = Windows Media Playerrstrui = System Restorenetscp6 = Netscape 6.xnetscp = Netscape 7.xnetscape = Netscape 4.xwaol = America Onlinecontrol = Opens the Control Panelcontrol printers = Opens the Printers Dialog
internetbrowser
type in u're adress "google", then press [Right CTRL] and [Enter]add www. and .com to word and go to it
Keyboard Shortcuts, Microsoft Word
Keyboard Shortcuts, Microsoft Word
Keyboard Shortcuts Result in Microsoft Word
CTRL and A Selects all in the current document.CTRL and B Bold text.CTRL and C Copies the item or text to the Clipboard and can be pasted using CTRL and V.CTRL and D Displays the Font dialogue box.CTRL and E Centre Alignment.CTRL and F Displays the Find dialog box, to search the current document.CTRL and G Displays the Go to dialog box, to go to a specific location in the current document.CTRL and H Displays the Replace dialogue box.CTRL and I Italic text.CTRL and J Full Justification.CTRL and K Create HyperlinkCTRL and L Left AlignmentCTRL and M TabCTRL and N Creates a new document.CTRL and O Displays the Open File dialogue box.CTRL and P Displays the Print dialog box.CTRL and R Right Alignment.CTRL and S Displays the Save dialog box.CTRL and U Underline textCTRL and V Pastes the copied item or text from the Clipboard into the current position in the document.CTRL and X Cuts the item or text selected to the Clipboard.CTRL and Y Redo the last undone action.CTRL and Z Undoes the last action.CTRL and ENTER Insert Page Break.CTRL and F2 Show Print preview.CTRL and F4 Closes the active document window.CTRL and F6 Opens the next document window.
Keyboard Shortcuts Result in Microsoft WordF1 key Get help or use the Office assistant.SHIFT and F1 Key Context sensitive help.F2 Key Move text or image.SHIFT and F2 Key Copy Text.F3 Key Insert an autotext entry.SHIFT and F3 Key Change the case of the selected text.F4 Key Perform last action again.SHIFT and F4 Key Perform a Find or Go to action again.F5 Key Displays the Go to dialogue box, from here you can also Find and Replace.SHIFT and F5 Key Move to a previous revision.F6 Key Go to the next frame or pane.SHIFT and F6 Key Go to the previous frame or pane.F7 Key Launch the Spell checker.SHIFT and F7 Key Launch the Thesaurus.F8 Key Extend the current selection.SHIFT and F8 Key Shrink the current selection.F9 Key Update the selected fields.SHIFT and F9 Key Switch between a field code and it's result.F10 Key Activate the menu bar.SHIFT and F10 Key Display a Shortcut Menu. Same as right clicking.F11 Key Go to the next field.SHIFT and F11 Key Go to the previous field.F12 Key Save file As, equivalent to tools menu.SHIFT and F12 Key Save document, equivalent to tools menu
Keyboard Shortcuts Result in Excel 2000 - Movement
F1 Key HelpF2 Key Edit current CellF5 Key GotoF7 Key Spell CheckF12 Key Save file asCTRL and A Select entire worksheet.CTRL and B Toggle Bold Text.CTRL and C Copies the item or items selected to the Clipboard and can be pasted using CTRL and V.CTRL and F Displays the Find dialog box.CTRL and H Displays the Replace dialog box.CTRL and I Toggles Italic Text.CTRL and N New File.CTRL and O Open File.CTRL and P Print.CTRL and S Save File.CTRL and U Toggles Underlined Text.CTRL and V Paste the contents of the clipboard.CTRL and X Cut the selected item.CTRL and Y Redo the last undone actionCTRL and Z Undoes the last action.CTRL and 1 Displays Format Cells Dialogue BoxCTRL and 5 Toggles Strikethrough Text
Keyboard Shortcuts Result in Excel 2000 - FormulasALT and = AutosumALT and F8 MacrosCTRL and ; Insert Current DateCTRL and : Insert Current Time
Keyboard Shortcuts Result in Excel 2000 - MovementLeft Arrow One Cell Left (also SHIFT and TAB)Right Arrow One Cell Right (also TAB)Up Arrow One Cell UpDown Arrow One Cell DownHome Go to End of rowCTRL and left Arrow Go to End of ColumnCTRL and Home Go to Top of Worksheet (A1)CTRL and End Go to End of WorksheetCTRL and PAGE-DOWN Go to Next Worksheet
Keyboard Shortcuts Result in Excel 2000 - Cell SelectionCTRL and Spacebar Select the entire ColumnSHIFT and Spacebar Select the entire RowCTRL and A Select Entire WorksheetSHIFT and Left Cursor Select all cells to the left of the active oneSHIFT and Right Cursor Select all cells to the right of the active one
How To Move Xp Harddrive To New Motherboard
really easy. but this only works if the original motherboard and harddrive still work. so put it back together. for newbies, go to control panel, double-click the system icon, go to hardware tab, and click device manager button. find the IDE ATA/ATAPI CONTROLLERS and expand the tab. not the primary or secondary controller, but right-click the first controller. choose update driver. choose the option to install from a list or specific location. click next. now choose the (don't search. I will choose the driver to install) option. click next. now highlight the Standard Dual Channel Pci Ide Controller. click next. the Standard controller will install. now reboot. log in. the standard controller is completely installed. you can now shutdown the computer, remove your harddrive, and it will boot with the new motherboard. i've done this 24 times on 12 different computers. it works.
How To Make XP Go Faster
Services You Can Disable
There are quite a few services you can disable from starting automatically.This would be to speed up your boot time and free resources.They are only suggestions so I suggestion you read the description of each one when you run Servicesand that you turn them off one at a time.
Some possibilities are:AlerterApplication ManagementClipbookFast UserSwitchingHuman Interface DevicesIndexing ServiceMessengerNet LogonNetMeetingQOS RSVPRemote Desktop Help Session ManagerRemote RegistryRouting & Remote AccessSSDP Discovery ServiceUniversal Plug and Play Device HostWeb Client
--------------------------------------------------------------------------------
Cleaning the Prefetch Directory
WindowsXP has a new feature called Prefetch. This keeps a shortcut to recently used programs.However it can fill up with old and obsolete programs.
To clean this periodically go to:
Star / Run / PrefetchPress Ctrl-A to highlight all the shorcutsDelete them
--------------------------------------------------------------------------------
Not Displaying Logon, Logoff, Startup and Shutdown Status Messages
To turn these off:
Start RegeditGo to HKEY_LOCAL_MACHINESOFTWAREMicrosoftWindowsCurrentVersionpoliciessystemIf it is not already there, create a DWORD value named DisableStatusMessagesGive it a value of 1
--------------------------------------------------------------------------------Clearing the Page File on Shutdown
Click on the Start buttonGo to the Control PanelAdministrative ToolsLocal Security PolicyLocal PoliciesClick on Security OptionsRight hand menu - right click on "Shutdown: Clear Virtual Memory Pagefile"Select "Enable"Reboot
For regedit users.....If you want to clear the page file on each shutdown:
Start RegeditGo to HKEY_LOCAL_MACHINESYSTEMCurrentControlSetControlSession ManagerMemory ManagementClearPageFileAtShutdownSet the value to 1
--------------------------------------------------------------------------------
No GUI Boot
If you don't need to see the XP boot logo,
Run MSCONFIGClick on the BOOT.INI tabCheck the box for /NOGUIBOOT
---------------------------------------------------------------------------------Speeding the Startup of Some CD Burner Programs
If you use program other than the native WindowsXP CD Burner software,you might be able to increase the speed that it loads.
Go to Control Panel / Administrative Tools / ServicesDouble-click on IMAPI CD-Burning COM ServiceFor the Startup Type, select DisabledClick on the OK button and then close the Services windowIf you dont You should notice
--------------------------------------------------------------------------------
Getting Rid of Unread Email Messages
To remove the Unread Email message by user's login names:
Start RegeditFor a single user: Go to HKEY_CURRENT_USERSoftwareMicrosoftWindowsCurrentVersionUnreadMailFor all users: Go to HKEY_LOCAL_MACHINESOFTWAREMicrosoftWindowsCurrentVersionUnreadMailCreate a DWORD key called MessageExpiryDaysGive it a value of 0
------------------------------------------------------------------------------
Decreasing Boot Time
Microsoft has made available a program to analyze and decrease the time it takes to boot to WindowsXPThe program is called BootVis
Uncompress the file.Run BOOTVIS.EXEFor a starting point, run Trace / Next Boot + Driver DelaysThis will reboot your computer and provide a benchmarkAfter the reboot, BootVis will take a minute or two to show graphs of your system startup.Note how much time it takes for your system to load (click on the red vertical line)Then run Trace / Optimize SystemRe-Run the Next Boot + Drive DelaysNote how much the time has decreasedMine went from approximately 33 to 25 seconds.
--------------------------------------------------------------------------------Increasing Graphics Performance
By default, WindowsXP turns on a lot of shadows, fades, slides etc to menu items.Most simply slow down their display.
To turn these off selectively:
Right click on the My Computer iconSelect PropertiesClick on the Advanced tabUnder Performance, click on the Settings buttonTo turn them all of, select Adjust for best performanceMy preference is to leave them all off except for Show shadows under mouse pointer and Show window contents while dragging
---------------------------------------------------------------------------
Increasing System Performance
If you have 512 megs or more of memory, you can increase system performanceby having the core system kept in memory.
Start RegeditGo to HKEY_LOCAL_MACHINESYSTEMCurrentControlSetControlSession ManagerMemory ManagementDisablePagingExecutiveSet the value to be 1Reboot the computer
---------------------------------------------------------------------------
Increasing File System Caching
To increase the amount of memory Windows will locked for I/O operations:
Start RegeditGo to HKEY_LOCAL_MACHINESYSTEMCurrentControlSetControlSession ManagerMemory ManagementEdit the key IoPageLockLimit
-----------------------------------------------------------------------------
Resolving Inability to Add or Remove Programs
If a particular user cannot add or remove programs, there might be a simple registry edit neeed.
Go to HKCUSoftwareMicrosoftWindowsCurrentVersionPoliciesUninstallChange the DWORD NoAddRemovePrograms to 0 disable it
4096 - 32megs of memory or less8192 - 32+ megs of memory16384 - 64+ megs of memory32768 - 128+ megs of memory65536 - 256+ megs of memory
How To Make Perfect Copies Of Maxis The Sims Discs, CloneCD Style
How To Make Perfect Copies Of Maxis The Sims Discs, CloneCD Style!
verry simple.. get the latest version from h**p://slysoft.com download it , install, restart.
now that it's installed. Click in the "Read to Image" icon.. click next to get to the next screen.. select "Protected PC Game" click next.. and after it makes the image.. exit the program..
Now re-open CloneCDclick on the "Write from image" icon.. clicik next.. select "Protected PC Game" and click next.. NOTE:!! i tested this method with an CD-RW.. so far i wont/cant test with a CD-R (shouldn't make a difference) because i'm down to my last 3 CD-R's.. so you can try a CD-R.. i dont care but sofar i tested with the TDK 80min/700mb CD-RW blanks..
now i had it working without a patch.. after i burnt the disc.. i installed the sims from the burnt copy and tried to load.. IT Worked! i've got the sims in the background as i speak!.. not sure if anyone else knew about this but i got this idea in a dream about Digimon and Dragon Drive.. (DONT EVEN ASK WHY!) but "Guilmon" and "Chibi" said Tom.. to make a Perfect copy of The Sims CD's.. Use Clone CD.. afterwards . i woke up.. and i tried it! henh .. uncanny hunh?
How to make key generators
How to make key generators?-===========================-Introduction------------I take no responsibility of the usage of this information.This tutorial, is for educational knowledge ONLY.Hi there, in this tutorial, I intend to teach you how to make a prettysimple keygen, of a program called W3Filer 32 V1.1.3.W3Filer is a pretty good web downloader...I guess some of you might know the program.I`ll assume you know:A.How to use debugger (in this case, SoftIce).B.How to crack, generally (finding protection routines,patching them,etc...).C.How to use Disassembler (This knowledge can help).D.Assembly.E.How to code in Turbo Pascal ™.Tools you`ll need:A.SoftIce 3.00/01 or newer.B.WD32Asm. (Not a must).C.The program W3Filer V1.13 (if not provided in this package), can be found inwww.windows95.com I believe.D.Turbo Pascal (ANY version).Well, enough blah blah, let's go cracking...Run W3Filer 32.A nag screen pops, and , demands registration (Hmm, this sux ;-)) Now,We notice this program has some kind of serial number (Mine is 873977046),Let's keep the serial in mind, I bet we`ll meet it again while we're onthe debugger.Well, now, let's put your name and a dummy reg code...set a BP on GetDlgItemTextA, and, press OK.We pop inside GetDlgItemTextA, Lets find the registration routine...I`ll save you the work, the registration routine is this::00404DB2 8D95A8FAFFFF lea edx, dword ptr [ebp+FFFFFAA8]:00404DB8 52 push edx ---> Your user name here.:00404DB9 E80B550000 call 0040A2C9 ---> Registration routine.:00404DBE 83C408 add esp, 00000008 ---> Dunno exactly what is it.:00404DC1 85C0 test eax, eax ---> Boolean identifier, 0 if:00404DC3 7D17 jge 00404DDC ---> registration failed, 1 ifOK.Well, Let's enter the CALL 40A2C9, and see what's inside it:(Please read my comments in the code).* Referenced by a CALL at Addresses::00404DB9 , :00407F76:0040A2C9 55 push ebp:0040A2CA 8BEC mov ebp, esp:0040A2CC 81C4B0FEFFFF add esp, FFFFFEB0:0040A2D2 53 push ebx:0040A2D3 56 push esi:0040A2D4 57 push edi:0040A2D5 8B5508 mov edx, dword ptr [ebp+08]:0040A2D8 8DB500FFFFFF lea esi, dword ptr [ebp+FFFFFF00]:0040A2DE 33C0 xor eax, eax:0040A2E0 EB16 jmp 0040A2F8* Referenced by a (U)nconditional or ©onditional Jump at Address::0040A2FB©:0040A2E2 0FBE0A movsx ecx, byte ptr [edx] ----> Here Starts theinteresting part.:0040A2E5 83F920 cmp ecx, 00000020 ----> ECX is the the currentchar in the user name, Hmm, 20h=' '...:0040A2E8 740D je 0040A2F7 ----> Let's see,:0040A2EA 8A0A mov cl, byte ptr [edx] ----> Generally, all this loopdoes, is copyingthe user name from[EDX], to [ESI], WITHOUT the spaces!(Keep this in mind! ).:0040A2EC 880C06 mov byte ptr [esi+eax], cl:0040A2EF 42 inc edx:0040A2F0 40 inc eax:0040A2F1 C6040600 mov byte ptr [esi+eax], 00:0040A2F5 EB01 jmp 0040A2F8* Referenced by a (U)nconditional or ©onditional Jump at Address::0040A2E8©:0040A2F7 42 inc edx* Referenced by a (U)nconditional or ©onditional Jump at Addresses::0040A2E0(U), :0040A2F5(U):0040A2F8 803A00 cmp byte ptr [edx], 00:0040A2FB 75E5 jne 0040A2E2 ----------------> This is the loop , we gotwhat it does,Let's continue tracingthe code...:0040A2FD 56 push esi --------> The user name is pushed, in ordertoUpcase it's chars.* Reference To: USER32.CharUpperA, Ord:0000h:0040A2FE E80F330000 Call User!CharUpper ---> After this, our name is inupper case.:0040A303 56 push esi -----> Our name in upper case here.* Reference To: cw3220mt._strlen, Ord:0000h:0040A304 E86F300000 Call 0040D378 ---> This is the length of our name.:0040A309 59 pop ecx:0040A30A 8BC8 mov ecx, eax ---> ECX=Length.:0040A30C 83F904 cmp ecx, 00000004 ---> Length>=4 (MUST).:0040A30F 7D05 jge 0040A316 ---> Let's go to this address...:0040A311 83C8FF or eax, FFFFFFFF:0040A314 EB67 jmp 0040A37D* Referenced by a (U)nconditional or ©onditional Jump at Address::0040A30F©:0040A316 33D2 xor edx, edx:0040A318 33C0 xor eax, eax:0040A31A 3BC8 cmp ecx, eax:0040A31C 7E17 jle 0040A335 ---> (Not important, just another uselesschecking).=============================================================================================== FROM HERE AND ON, THE IMPORTANT CODE, PAY ATTENTION =====================================================================================================One thing before we continue, EDX = 00000000h as we enter to the next instructions.* Referenced by a (U)nconditional or ©onditional Jump at Address::0040A333©:0040A31E 0FBE1C06 movsx ebx, byte ptr [esi+eax] ---> EBX <--- char in username, offset EAX.:0040A322 C1E303 shl ebx, 03 -----> Hmm, it shl's the char by 03h...(Remember that).:0040A325 0FBE3C06 movsx edi, byte ptr [esi+eax] ---> Now EDI <--- Char inuser name , offset EAX.:0040A329 0FAFF8 imul edi, eax -----> It multiplies the char by theoffset in user name! (Remember that).:0040A32C 03DF add ebx, edi -----> Adds the result to EBX (That wasShelled (Ding Dong =)).:0040A32E 03D3 add edx, ebx -----> EDX=EDX+EBX!!! - This is the COREof this registration routine!!!:0040A330 40 inc eax -----> Increase EAX by one (next char).:0040A331 3BC8 cmp ecx, eax:0040A333 7FE9 jg 0040A31E ----> If ECX HMMMMMM, What's inhere?????:0040A33A C1F803 sar eax, 03 ---------> WAIT! Please type in SIce '?EAX'Does this number in EAX lookfamiliar to us? ;-)If you still don`t understand,than, It'sour SERIAL NUMBER! (PLEASE, takeyour time, and check byyourself - don`t trust me!). OK,so now we know,That it SHR's EAX by 03 (SAR isalmost identical to SHR).:0040A33D 03D0 add edx, eax ---------> Hmm, it adds the result from theloop, the serial number shr'd by 03h:0040A33F 52 push edx -------> Let's continue. (At this point, Ican tell you , the reg number, isin EDX - only that the reg numberis in HEX --> That's how you enter it).* Possible StringData Ref from Data Obj ->"%lx":0040A340 685EF54000 push 0040F55E:0040A345 8D95B0FEFFFF lea edx, dword ptr [ebp+FFFFFEB0]:0040A34B 52 push edx* Reference To: USER32.wsprintfA, Ord:0000h:0040A34C E8E5320000 Call 0040D636 -------> This one, does HEX2STR (Takesthe value from EDX, and turns it to an hex string).:0040A351 83C40C add esp, 0000000C:0040A354 8D8DB0FEFFFF lea ecx, dword ptr [ebp+FFFFFEB0] -----> type 'd ecx' -THIS is the reg number! That's enough for us, the rest ofthe code, isjust for comparing the correct reg code with ours.:0040A35A 51 push ecx* Reference To: USER32.CharLowerA, Ord:0000h:0040A35B E8B8320000 Call 0040D618:0040A360 8D85B0FEFFFF lea eax, dword ptr [ebp+FFFFFEB0]:0040A366 50 push eax:0040A367 FF750C push [ebp+0C]* Reference To: cw3220mt._strcmp, Ord:0000h:0040A36A E875300000 Call 0040D3E4:0040A36F 83C408 add esp, 00000008:0040A372 85C0 test eax, eax:0040A374 7405 je 0040A37B:0040A376 83C8FF or eax, FFFFFFFF:0040A379 EB02 jmp 0040A37D* Referenced by a (U)nconditional or ©onditional Jump at Address::0040A374©:0040A37B 33C0 xor eax, eax* Referenced by a (U)nconditional or ©onditional Jump at Addresses::0040A314(U), :0040A379(U):0040A37D 5F pop edi:0040A37E 5E pop esi:0040A37F 5B pop ebx:0040A380 8BE5 mov esp, ebp:0040A382 5D pop ebp:0040A383 C3 retMaking the actual Keygen~~~~~~~~~~~~~~~~~~~~~~~~Now, after I've explained how does the program calculate the registrationcode, you can either write your own keymaker, without looking at my code, orlook at my code (in Turbo Pascal - sorry for all you C lovers ;-) Next time).That's it, here's the source of my keygen:------------------- Cut here ---------------------------------------------Program W3FilerKeygen;varKey,SerialNum,EB,ED,digit:Longint;I,x:Byte;Name,KeyHex:String;beginWriteln(' W3Filer32 V1.1.3 Keymaker');writeln('Cracked by ^pain^ ''97 / Rebels!');Write('Your Name:'); { Read the name }readln(Name);Write('Serial Number:');readln(SerialNum); {Yes, we need the serial number for the calculation!}Key:=0;x:=0;For I:=1 to length(Name) dobeginName[I]:=upcase(Name[i]);If Name[I]<>' ' then begineb:=ord(Name[I]) shl 3; {EB = Name[I] Shl 03h}Ed:=ord(Name[I]); {ED = Name[I]}ed:=ed*(x); {ED=ED*Offset}inc(x);eb:=eb+ed; {Add ED to EB}Key:=Key+EB; {Add EB to KEY}end;end;Key:=Key+(SerialNum shr 3); { Add SerialNum shr 03h to Key}{ From here, this is just HEX2STRING --> I`m quite sure it'sSelf explaintory, else - go and learn number bases again! ;-)}KeyHex:='';repeatdigit:=Key mod 16;key:=key div 16;If digit<10>10 then KeyHex:=Chr(Digit-10+ord('a'))+KeyHex;until key=0;writeln('Your Key:',KeyHex);writeln(' Enjoy!');end.
How To Make Free Phone Calls
How To Make Free Phone Calls
Have you ever got stuck some ware and just about 6'ft away from you there is a pay phone, but yet you dont have any change(=( bummer) to call your famaly members or some one to come and pick you up(hehe that sux)?
Well im going to show you some thing that might get you arrested(shit now what) or it might get you home( now thats what im talking about!)its a chance that you have to take depends were are you.
Ok now before we go on let me let you know that this is not thateasy to do, but anyways lets start. A pay phone is not like a regular home phone. A pay phone runs through a diffrent amount of electricity and wires even the electricity flow is diffrent, Well anyways that is enoght of electrical talk lets get to the good part.
Ok to get free call's on a pay phone you will frist have to twist the phone wire just about 50 to 60 times then you will pull on the phonewire untill the metal part crackes off phone keep doing it if the metalpart is completely off the phone....Now assuming that it is off you willsee a few colored wires in side the metal wire of the pay phone there should be a black, red, yellow one in side it and a really metallthick one in the middle(NOTE that some phone has diffrent colored wires)now the one wire that we are looking for is the black one. Now here ishow its done.. rip off the plastic of that wire(you can take it out with your teeth, you wont get electricuted =) hehe ).
Now assuming that you have taken apart the plastic off the wire(does not has to be all of it)now you will take that wire and aply it to the phone with the metal part of the phone touching the wire that you ripped off its plastic.. if you are aplying it correctly then you should here a static on the phone.. so make sure you have that phone on your ear.. now with the wire being aplyed to the phone(the metal part right next tothe buttons)Dial the number that you wish to call.. onces you hear it ringing then you can let go of the wire that you was applying.. and BINGO... say hello to mami and daddy for me =).. welp that is all enjoy your call.. ohh and by the wayyes this also comes with long distance hehe, and no! you can not use it to logg on to aol... Peace.
site: www.h4ckerx.netAim: xlordtIrc: irc.h4ckerx.net
Email: xlordt@h4ckerx.net
Copyright @h4ckerx.net
How To Make An Animted Logo
How To Make An Animted Logo, the easy way
Things you will need:QUOTE1. Photoshop or Paintshop (any versions)2. Xara3D 5.xx3. Jasc animation shop 3.xx4. DUH!! A pic you want as a logo LOL
Things you MIGHT need: 1. a computer 2. Internet connection 3. consciousness 4. corn on the cob
Here they are for your convinience:Adobe Photoshop CS v8.0 thanx to TheCollectorhttp://www.shareordie.com/index.php?showto...85&hl=Photoshop
Jasc Paint Shop Pro 9.0 Retail thanx to arclitehttp://www.shareordie.com/index.php?showto...&hl=Jasc&st=100
Xara3D 5.02 thanx to Zabrefhttp://www.shareordie.com/index.php?showtopic=6512&hl=XARA
Jasc Animation Shop 3.11 thanx to sev7enhttp://www.shareordie.com/index.php?showtopic=34928&hl=
Steps:1. Using your photo editor fix/touch up you pic/logo to your liking….too easy(example bellow)user posted image
2. Save it some where easy to find, for example “C:\pictures” or “C:\Windows\thecenterofhell\system\system32\system64\system128\???” although I don’t recommend the second one.
3.Open Xara3D 5.xx, press “Alt+T” or click on the “T” button on the LEFT PANEL erase all of the text in the window that pops up then press ok.user posted imageuser posted image
4. Press “Alt+U” or click on the yellow “U” surrounded in gray on the LEFT PANEL, check the “button” box and select a desire button type and leave this option window open you will need it again.user posted image
5. Press the “At+X” or click the black “X” on the LEFT PANEL, click “load texture” in the pop up window, find the picture you made/adjusted and highlight it then click open or just double-click it. Use the “size, x, y, angle” sliders to adjust the picture or “texture” and in the “button options” windows use the “stretch, corners”(corners, only if using this option you can adjust) to adjust the button size.user posted image
6. Press “Alt+A” or click the black “A” on the LEFT PANEL with what looks like to me is a half-halo with an arrow tip!? Anyway, here is a quick rundown on what the options here do: (BY THE WAY TO ACTIVATE OR “PREVIEW ANIMATION” PRESS “Ctrl+spacebar”).user posted image
A. Frames per cycle: This is the number of frames for each complete cycle through the animation sequence. The greater the number of frames the smoother the animation. The drawback is that the file is bigger - this is a big disadvantage for web graphics. You may need to try different values to get the best results. B. Frames per second: The animation speed. Slow speeds can give jerky movement. High speeds can also give jerky movement as the program displaying the animation may not be able to keep up. Again you may need to try different values. C. Pause: This pauses the first frame before continuing the rest of the animation. Type in a value in centiseconds (1/100ths of a second) - a 2 second pause is 200 cs. Note that this applies only to the first frame; use Frames per cycle and Frames per second to control the overall speed of the animation. D. Loop Value: Unchecked is Infinite, Any other value see for yourself. Lmao E. Loop: This lets you specify how many times the animation should repeat itself. Note that some browsers take any value other than 1 to mean 'loop forever'. Therefore, your animation either plays once or forever. F. Style: This controls the type of animation:Rotate 1 rotates all the text as one; Rotate 2 rotates each character. (Buttons have a single Rotate option.) Rotate text/Rotate lights - select whether you want the text to rotate or the lights or both. You cannot rotate the shadow as this would create very large files. Direction - selects the direction of rotation.
Swing options: Swing 1 swings all the text as one; Swing 2 swings each character. (Buttons have a single Swing option.) Angle - how much you want the heading to swing.
Pulsate options: Pulsate 1 pulsates all the text as one; Pulsate 2 pulsates each character. (Buttons have a single Pulsate option.) Minimum text size - how far back to pulsate the text. Shrink+Grow & Grow+Shrink - only have an effect if you Pause the animation. These options select the starting point for the animation (maximum or minimum.)
Fade options: Fade in - the heading emerges from the background color. Fade out - the heading merges into the background color. SO AFTER PICKING ONE………………..
7. On the top left go to FILE>>>EXPORT ANIMATION or press “Ctrl+Shift+X” and save in desired location.user posted image
8. When the next window pops up (Export as animated gif save location then options): Experiment with each one to get it right, but remember the SoD rules about Siggys and Avatars.user posted imageuser posted image
Because Animated GIFs can be quite large, you may find that a 16 or 32 color, optimized palette per frame, produces the best results for the smallest file size. However you might need to experiment.Dithering always makes GIFs look better, but also makes them larger. When outputting at 256 colors you may find that there is no need to turn dithering on.Current Window Size lets you export just the area surrounding the text (Crop on) or the entire window area (Crop off.)User Defined lets you specify the dimensions of the bitmap.
how to make a VCD from a DivX
Tools required: Latest Virtual dub, TMPGEnc and Nero ( and the DivX codecs.)
Preparing:Download all tools, Be sure to install DivX 3.11 DivX4 and the latest DivX5 codecs.
Extracting the audio : Start Virtualdub. Open your video File->Open video file.(if you get any warnings just ignore them because you won't edit the video just extract the audio)Select File->File Information and note the fps as the video source fps because you will need it later.Select under Audio->Full processing mode.Select Audio->Compression and selectSelect Audio->Conversion.Change the the Sampling rate to 44100Hz if you are going to make VCD or SVCD MPEGs.Save the wav by clicking on File->Save WAV...the wav will be a huge audio uncompressed video file(about 10 MB/minute.Encoding:Start TMPEnc. Press cancel if the Project Wizard comes.Press Browse… and select the DivX file as Video source input.Now you press the Browse button for choosing the Audio source input and use the saved wav file.Press load and load the file which in the Template directory of TMPGenc.If the video source fps is 29,970 load VideoCD (NTSC).mcfIf the video source fps is 23,970 load VideoCD (NTSCFilm).mcfIf the video source fps is 25,000 load VideoCD (PAL).mcfIf the video source fps is anything else else just load NTSC if you live in US or Japan and PAL if you live anywhere else.Note if you live in US or Japan and get problem playing PAL, often causing black and white TV playback problems, then first check if you can change to PAL on your TV or DVD Player if not then instead convert it to NTSC by loading the VideoCD(NTSC) template.Note if you live Europe and the rest of the world and get problem playing NTSC or NTSCFilm, often causing black and white TV playback problems, then first check if you can change to PAL on your TV or DVD Player if not convert it to PAL by loading the VideoCD(Pal) template.
Press Settings and choose Advanced.Select Full screen (keep aspect ratio) under Video arrange method to keep the same aspect ratio(widescreen,fullscreen) as the video source(if you have a widescreen movie and you want it to be in fullscreen select No margin(keep aspect ratio).Select Source range and double-click on it with the mouse.
In the next dialog you can choose the source range. This process depends on the DivX file. If the DivX file is less than 80min (for a 80min/700mb CDR) then you do not have to split the file to two CDs. Also if the DivX file is already in two parts you have just to convert the first file and then the second. But if there should be the case that the movie is in one file over 80minutes long then it is necessary to select the source range. In this new dialog you put the horizontal scrollbar to the middle of the selection so that you will get the same length on the first CD as on the second. After you selected the middle do you have press Set end frame. A new value should be under End Frame. This value you should notice somewhere for the encoding of the second part. Of course the start frame must be 0.
After pressing ok, you only have to select the output file name. I prefer the movie name with the CD number (e.g. Ghost in the Shell CD1) for the burning.Now encode the file by pressing the Start-Button.While encoding you can select File->Preview(it won't effect the encoding) to see how the output will be, it it looks wrong(widescreen or fullscreen) you can stop the encoding and start over and change especially the Settings->Advanced->Video arange method.)If you only want to burn the movie on one CD jump to the burning guide else follow the next points.
Repeat the third, forth and fifth point. In the source range dialog you now use as Start frame the noticed value and move with the horizontal scrollbar to the end of the movie.After pressing Set end frame, press two times OK.
Now select the output filename for the second file. (e.g. Ghost in the Shell CD2) and encode it.After the encoding is done and you did all right, you should have for every CD a file.
Burning:Launch Nero.Close the Wizard. Select File->New.1. Select VideoCD2. Select PAL or NTSC depending what format your source MPEG is in.3. And hit New.
1. Locate your .mpg and drag it(see picture below). Remember that you can add several .mpgs also, each mpg will be a own track on the VCD and you can add data files also, just drag them to any folder.2. Check the time. It should be the same as in the movie.
3. Rename the CD to anything you like by clicking F2 on NEW.
4. Select File->Write CD.
don't know about everyone else.. but the only options i choose on tmpgenc to make mpeg-1 files are either NTSC film 23.976, or NTSC video 29.97 fps..
i also live in the u.s. so i do all of mine accordingly.. why do you save the wave file with virtual dub.. or should i say, why do you even process the divx file with vdub.. yeah if it is your last resort and the divx for some reason doesn't open in tmpgenc.. i've got 180+ Divx movies, some downloaded mostly ripped, never had a problem encoding them with tmpgenc plus.
just seems like you are going from your a$$ to your elbow to do this.
1. take divx movie (120 minutes long for example).. open with vdub.. find a keyframe about halfway through the film, preferrably at a scene change.
choose "SET SELECTION START" from the EDIT menu.. scroll all the way to the end of the film, choose "SET SELECTION END"... hit DELETE or choose "DELETE SELECTION", all from the EDIT menu
2. Now you have 1 half of your movie. under the VIDEO menu, choose "DIRECT STREAM COPY", also make sure that under AUDIO is going to generate a "DIRECT STREAAM COPY". Then go to FILE and choose "SAVE as AVI..."
on a newer computer this will take less than 2 minutes..
3. When it is complete, the quickest way to proceed is to just click on FILE / "OPEN VIDEO FILE". at the beginning of the clip, choose "SET SELECTION START" again, snap back to the keyframe (half way through the film) which you cut half the film off at and choose "SET SELECTION END". DELETE... FILE / "SAVE AS AVI..." save as the other half of film..
once again, will usually take less than 2 minutes...
4. choose option accordingly, this next part can be important.. (i'm going to give the rest of the instructions as if you were making ntsc movie)
since you want to make a standard mpeg-1 file, choose NTSC FILM or NTSC VIDEO.. BROWSE for your file, then hit NEXT, then it OTHER SETTINGS / ADVANCED tab ... now there is an option that says "VIDEO ARRANGE METHOD".. if you are making a fullscreen movie, lleave on FULLSCREEN.. if you are encoding a widescreen movie, choose "FULL SCREEN (KEEP ASPECT RATIO).. OK / NEXT / NEXT (you get the point)
basically takes 1 step out of the tutorial above.. the instructions for nero appear to be correct.. but here's another tip..
dvd burners are becoming more and more popular and even i got one now, like many of you do. tired of old vcd's or wanna encode a VCD standard DVD with nearly 9 hours of video (but same quality as normal 80 minute VCD),
if this is the case, make sure you encode your DivX files as "NTSC VIDEO 29.97 FPS".. even if source is 23 fps... and once you have 3 or 4 movies, get yourself a proggy called TMPGENC DVD AUTHOR.. make a track for each movie.. and you got yourself a dvd with 3 or 4 average length movies on 1 dvd (with menus if you like) that is WAY MORE COMPATIBLE than a VCD..
do a search for the keyword VCD-DVD and i posted a more descriptive tutorial on how to do this..
Preparing:Download all tools, Be sure to install DivX 3.11 DivX4 and the latest DivX5 codecs.
Extracting the audio : Start Virtualdub. Open your video File->Open video file.(if you get any warnings just ignore them because you won't edit the video just extract the audio)Select File->File Information and note the fps as the video source fps because you will need it later.Select under Audio->Full processing mode.Select Audio->Compression and select
Press Settings and choose Advanced.Select Full screen (keep aspect ratio) under Video arrange method to keep the same aspect ratio(widescreen,fullscreen) as the video source(if you have a widescreen movie and you want it to be in fullscreen select No margin(keep aspect ratio).Select Source range and double-click on it with the mouse.
In the next dialog you can choose the source range. This process depends on the DivX file. If the DivX file is less than 80min (for a 80min/700mb CDR) then you do not have to split the file to two CDs. Also if the DivX file is already in two parts you have just to convert the first file and then the second. But if there should be the case that the movie is in one file over 80minutes long then it is necessary to select the source range. In this new dialog you put the horizontal scrollbar to the middle of the selection so that you will get the same length on the first CD as on the second. After you selected the middle do you have press Set end frame. A new value should be under End Frame. This value you should notice somewhere for the encoding of the second part. Of course the start frame must be 0.
After pressing ok, you only have to select the output file name. I prefer the movie name with the CD number (e.g. Ghost in the Shell CD1) for the burning.Now encode the file by pressing the Start-Button.While encoding you can select File->Preview(it won't effect the encoding) to see how the output will be, it it looks wrong(widescreen or fullscreen) you can stop the encoding and start over and change especially the Settings->Advanced->Video arange method.)If you only want to burn the movie on one CD jump to the burning guide else follow the next points.
Repeat the third, forth and fifth point. In the source range dialog you now use as Start frame the noticed value and move with the horizontal scrollbar to the end of the movie.After pressing Set end frame, press two times OK.
Now select the output filename for the second file. (e.g. Ghost in the Shell CD2) and encode it.After the encoding is done and you did all right, you should have for every CD a file.
Burning:Launch Nero.Close the Wizard. Select File->New.1. Select VideoCD2. Select PAL or NTSC depending what format your source MPEG is in.3. And hit New.
1. Locate your .mpg and drag it(see picture below). Remember that you can add several .mpgs also, each mpg will be a own track on the VCD and you can add data files also, just drag them to any folder.2. Check the time. It should be the same as in the movie.
3. Rename the CD to anything you like by clicking F2 on NEW.
4. Select File->Write CD.
don't know about everyone else.. but the only options i choose on tmpgenc to make mpeg-1 files are either NTSC film 23.976, or NTSC video 29.97 fps..
i also live in the u.s. so i do all of mine accordingly.. why do you save the wave file with virtual dub.. or should i say, why do you even process the divx file with vdub.. yeah if it is your last resort and the divx for some reason doesn't open in tmpgenc.. i've got 180+ Divx movies, some downloaded mostly ripped, never had a problem encoding them with tmpgenc plus.
just seems like you are going from your a$$ to your elbow to do this.
1. take divx movie (120 minutes long for example).. open with vdub.. find a keyframe about halfway through the film, preferrably at a scene change.
choose "SET SELECTION START" from the EDIT menu.. scroll all the way to the end of the film, choose "SET SELECTION END"... hit DELETE or choose "DELETE SELECTION", all from the EDIT menu
2. Now you have 1 half of your movie. under the VIDEO menu, choose "DIRECT STREAM COPY", also make sure that under AUDIO is going to generate a "DIRECT STREAAM COPY". Then go to FILE and choose "SAVE as AVI..."
on a newer computer this will take less than 2 minutes..
3. When it is complete, the quickest way to proceed is to just click on FILE / "OPEN VIDEO FILE". at the beginning of the clip, choose "SET SELECTION START" again, snap back to the keyframe (half way through the film) which you cut half the film off at and choose "SET SELECTION END". DELETE... FILE / "SAVE AS AVI..." save as the other half of film..
once again, will usually take less than 2 minutes...
4. choose option accordingly, this next part can be important.. (i'm going to give the rest of the instructions as if you were making ntsc movie)
since you want to make a standard mpeg-1 file, choose NTSC FILM or NTSC VIDEO.. BROWSE for your file, then hit NEXT, then it OTHER SETTINGS / ADVANCED tab ... now there is an option that says "VIDEO ARRANGE METHOD".. if you are making a fullscreen movie, lleave on FULLSCREEN.. if you are encoding a widescreen movie, choose "FULL SCREEN (KEEP ASPECT RATIO).. OK / NEXT / NEXT (you get the point)
basically takes 1 step out of the tutorial above.. the instructions for nero appear to be correct.. but here's another tip..
dvd burners are becoming more and more popular and even i got one now, like many of you do. tired of old vcd's or wanna encode a VCD standard DVD with nearly 9 hours of video (but same quality as normal 80 minute VCD),
if this is the case, make sure you encode your DivX files as "NTSC VIDEO 29.97 FPS".. even if source is 23 fps... and once you have 3 or 4 movies, get yourself a proggy called TMPGENC DVD AUTHOR.. make a track for each movie.. and you got yourself a dvd with 3 or 4 average length movies on 1 dvd (with menus if you like) that is WAY MORE COMPATIBLE than a VCD..
do a search for the keyword VCD-DVD and i posted a more descriptive tutorial on how to do this..
Subscribe to:
Posts (Atom)
